Tuesday, March 22, 2016

My Budget Korean Skincare Routine


Hi lovelies! Today I'm going to let you know about my Korean skincare routine. ^^ When I lived in the States, I basically followed the same Clinique 3-step routine I had since high school. That was ok for a while, but when I was in my twenties my skin started to need a little more TLC. Once I moved to Seoul, I became concerned about the effects of the pollution and time spent outside walking on my skin. Luckily, Korean skincare is very affordable, very effective, and VERY available! There are skincare and cosmetics stores on every corner in Seoul! 


One of the distinguishing characteristics of Korean skincare routines is how many steps they have compared to what I used to do. There were essences and sheet masks and tons of stuff I'd never even heard of!

Like wtf is this facial mist everyone is obsessed with?

The trick is to add each step in one at a time and see how your skin reacts to it. My skin has always been pretty clear, but switching to a Korean routine has really helped soften and brighten my skin. Hopefully it's been helping prevent wrinkles too! 

As for the prices of my products, I try to keep them affordable as I'm only working part time these days. When I was working full time, I could afford the more expensive dept store brands...but I've still managed to come up with a great routine for my skin on a budget. ^^

By the way, my skin type is normal-dry depending on how well hydrated I am. It definitely runs a bit drier in the cold months, so my winter/spring products are a little heavier than my summer/fall stuff. 

I'll split the routine into 3 parts, as follows~~~

Part 1: Cleansing


Step 1: remove eye makeup
This is the first step! Use a gentle remover and a cotton pad or balls and softly press down on the eye area. Never use harsh tugging or sweeping motions. 

My choice: My favorite remover is Clinique Take the Day Off, but Korea has some great budget ones. I love the Innisfree Apple Juicy Eye Makeup Remover, but these days I'm actually using a Japanese remover from Bifesta I picked up at Olive Young.


I'm sure many of you have heard that double cleansing is key to a Korean skincare routine. Here's how that works:

Step 2: Oil/balm cleanser
First you need to apply an oil or balm cleanser to dry skin to remove your makeup and sunscreen. I'm using an oil cleanser now, but I usually prefer balm cleansers (they're easier to remove and don't get in your eyes and much). Don't be afraid to take it over your eyes to remove any lingering eye makeup. Then rinse well with warm (never hot!) water.

My choice: I'm using the Innisfree Apple Juicy cleansing oil. As for balm cleansers, I recommend Banila Cleanse It Zero, Lush Ultrabland, and The BodyShop's Chamomile cleansing balm. 

Step 3: Cleansing milk/foam
The next step is to cleanse one more time with a gentle, low pH cleanser. Tbh, I'm not using a low pH cleansing foam at the moment but I'm happy with mine until it runs out. There are tons of options out there though! Hadolabo makes a gentle cleansing foam if you prefer something foaming. I'll look into Missha's Super Aqua cleansing milk next. Whatever you use, make sure it doesn't dry out your skin or leave it feeling tight. I use an all natural konjac sponge from Innisfree to really make sure I'm deeply cleansing. 

My choice: Innisfree Olive Real cleansing foam

Step 4: Exfoliate

Twice a week or so I exfoliate gently with a scrub. I have one with really fine grains for all over exfoliation, then a sugar scrub mask I just use on my nose once a week. If you prefer chemical exfoliant treatments like AHA or BHA, this is when you should use them. I'll probably start adding their into my routine this summer.

My choice: Skinfood strawberry black sugar scrub 
Yes to Grapefruit daily facial scrub

Part 2: Hydrating Layers


This is the fun part where you can really mix and match treatments for your skin type! There are so many options it can get overwhelming, so I recommend starting small. This is also where most of your money in your routine should go. I follow the Caroline Hirons school of thought: pay more for treatments and serums than creams. Do you spend more money on the outfit or the coat covering it up? Let's go!

Step 5: Hydrating Mist
This step isn't super necessary, I just enjoy it. After cleansing, I spray a pH adjusting mist over my face and let it settle for a minute to balance things and give myself a nice canvas for my treatments. If you're not using a low pH cleanser, I also recommend a pH balancing toner. Any hydrating mist you like works though, even Evian. Vichy makes a nice basic one too.

My choice: Dr. G Hydra Fresh pH Mist

Step 6: First essence
Korea has a different attitude towards toners than the US of my youth. I remember the old Sea Breeze days. Even my Clinique Type 2 I used for years had exfoliating properties and contained alcohol. Korea eschews astringent toners and instead uses watery hydrating treatments to prep your skin for moisture. There are lots of options, but the Missha FTE is my tried and true favorite. You can apply it with a cotton square, but that wastes a lot of product. Instead, I put a few drops in my hands and splash it directly onto my face. Pat gently for full absorption.

My choice: Missha First Treatment Essence 

Step 7: Hydrating toner
These are actually usually called toners or lotions and are slightly thicker than first treatments. They're still very watery, however, and I apply them the same way. The one two punch of first essence and hydrating toner is great to prep your skin for the heavier treatments! 

My choice: Actually a Japanese product, and one of my HGs. Lots of other bloggers have written about it! 
Hadolabo gokujyun lotion. You can buy it at Watsons or Olive Young. There's a blue one, which is supposed to be brightening, and a white one which is supposed to be more hydrating. I love them both equally. ^^

Step 8: Eye cream
You should absolutely apply eye cream before any serums or essences that will inhibit absorption in the eye area. I use the same one basically twice a day, but I do have a slightly heavier one (weirdly called a serum) that's very viscous and sticky for a few nights a week. 

My choice: Innisfree Eco Science eye cream
Missha Time Revolution Night Repair Science Activator eye serum 


Part 3: More Layers!


Step 9: Serums and ampoules
This can involve however many products you need for your skin. I tend to use just 1-2mornings and 3-4 at night. When layering, apply them in order of consistency: lighter first, then heavier. 

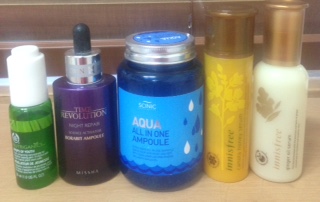
My choice: I change them up by season, but the one I can't live without is the Missha Time Revolution Night Repair Science Activator Borabit Ampoule (phew! Long name!) hereafter known as the "purple one" lol. It's meant to be a dupe of the Estée Lauder Night Repair serum, and the ingredients list is similar. Apply that one morning and night. 
I also like: 
The Body Shop Nutriganics Drops of Youth
Scinic Aqua all in one ampoule 
Innisfree Canola Honey serum
Innisfree Ginger Oil serum (especially for winter--that stuff is rich!)

Part 4: Finishing Touches


Step 10: Face oil
This is a step I've gotten into recently, and is not necessary for everyone. I only use it at night tbh. Just put a couple drops in your hands, run them together, then gently press the oil into your face over the serums.

My choice: Dioderma carrot oil (actually it's a German brand, my friend Stella brought me some from a recent trip. Thanks, girl! <3)

Step 11: Moisture cream
You should have a finishing cream to to seal in all your products and make your skin super soft. As I said, an expensive cream isn't very important. Just choose one you like. Your face probably feels like a 10 layer wedding cake with all the products now. That means your doing it right! ;)

My choice: The Faceshop Mango Seed volume butter. I'm so addicted the the scent! It has a cute heart shaped applicator/ facial massager too. 
Laneige Water Bank cream or gel cream (the latter for summer or combination skin)

Step 12: Sleeping Pack
You might ask "Angela, my face is already covered in crap! Do I really need one more just for night!?" I would say, you don't NEED one, but try and see if it makes a difference! I use mine every night because I give no f#%^s, but try a couple nights a week and see what works for you.

My choice: Laneige Water Bank sleeping back
Innisfree Green Tea sleeping pack

Step 13: Sheet masks (optional)
These are crazy popular in Korea, and for good reason. I don't do them as frequently as I should, but they really do give your skin an instant shot of moisture and plumpness. I use these directly after step 8 (eye cream), and nothing else after. Just leave the mask on the directed time then pat all the goodness into your skin right before bed. Don't rinse it off! I recommend sheet masks once or twice a week, but you do you. ^^

Step 14: Sunscreen (NOT optional)
The best thing I ever did for my skin when I moved to Korea was start wearing sunscreen (or sun cream as it's usually called here) every day. I'm serious, rain or shine, put that shit on your face! Even if you're just staying inside, UV rays can come in through the windows. Anti-aging products are awesome, but they tend to make your skin photosensitive. Daily sunscreen is also the best for age prevention, trust me! A good sunscreen will glide over your other products and provide a silly base for your makeup/primer.

My choice: Missha All Around Safe Block Essence Sun SPF 45/ PA+++ (the pink one).

Fresh faced and ready to start the day! :3
Did you make it to the end? Lol. I know, it's a lot. I plan on making some changes later in the year, but this is working great for me for now. Have you tried any of these products? Feel free to ask any questions about products or routine in the comments! 

Kisses,
Angela


Tuesday, August 11, 2015

Korean Style Ulzzang (얼짱) Makeup


Most of you familiar with Korean beauty trends will have heard of the ulzzang or "best face" phenomenon here. I don't usually wear this style, but can't call myself a blogger about Korean beauty without an attempt! Now, there are different ways to achieve this look and of course, as a Western woman, the look will look different on me than on Korean girls. The important thing is staying true to the principle. The basic concept for an ulzzang look is to make your face as doll-like as possible. That means big puppy dog eyes, flawless skin, and a small cute mouth. The makeup itself is meant to look minimal and natural. Another key feature of this look is enhancing the V-line shape of your face with contouring.


From what I understand, ulzzangs are famous on the internet for being pretty. I guess it's like the girls who call themselves "Instagram models" back home, but focusing only on the face. There are also guy ulzzangs who happen to be super talented at being cute, and you better believe they wear at least BB cream and eyebrow pencil!


Part 1: Day Look

Ok, let's get started with the makeup! Here's my Caucasian girl interpretation:


There are two schools of thought about ulzzang base makeup. It used to always have a dewy finish, usually achieved with a BB or CC cream. Lately, I've seen some applying powder for a matte finish. It doesn't really matter, but I prefer a dewy look. After applying my Etude Wonder Pore primer, I'm going to use the TonyMoly Luminous Pure Aura CC cream SPF30 PA++. It only comes in one shade and blends pretty well on my fair skin, though I'm not sure about darker skin tones. This stuff gives a really nice dewy finish, which I'll discuss in further detail when I do a mulgwang or "wet skin" tutorial later. ^^


Just dot one pump's worth all over your face and blend with your fingertips. The result should be a smooth canvas with a slight sheen.

Now go ahead and apply a lip balm to soften your lips. You'll wipe it off later, but lip concealer can really sink in and look gross if your lips are chapped. I like the classic Smith's Rosebud Salve.


Next, the eyes! I'm gong to use my trusty Urban Decay Naked palette (original) to create a subtle look that enlarges the eyes. Seriously, do yourself a favor and buy this palette! All of the Naked palettes are great, but I maintain that the original is the most versatile. For example, I sometimes use a stiff brush to apply Naked or Buck over my eyebrows to thicken them and set the pencil. 

You can use any eyeshadow you want, but they should be similar to these. You're going to want 3 shades: 

1) Virgin: a shimmer white 
2) Naked: a matte nude brown
3) Buck: a matte warm light brown


Got 'em? Good. Get yourself a fluffy blending brush (I use the one that comes with the palette). There are three steps with the eye shadow.

Step 1: Blend shades 1 and 2 and apply all over your lid (not above the crease). 


The effect should be subtle and it should closely match your natural skin color. 

Step 2: Using an angled brush, apply shade 3 to the outer corners of your lid (not quite 1/3).


It should be extended down slightly at the end for a round puppy dog look. 

Step 3: Accentuate the "aegyo sal" or eye bags. Just apply shade 1 all along the bottom lashed to highlight the under eye area. 


If you want to use shade 2 just under to make the bags more pronounced, feel free (I usually skip that one). 

Now for eyeliner! Aside from flawless skin, liner is arguably the most important feature of ulzzang makeup. 


Using a black liquid liner (Clio KillBlack ftw!), start at the inner corner of your eye and line it all the way across. Extend the line straight out from the outer corner to make your eyes look wider. Skip liner on the bottom lashes. 

Next, add mascara! It's best not to use false eyelashes for this look--the emphasis should be on the liner. 


Eyes done! Now for face contouring.

I'm by no means a master of contouring, so I prefer to keep it subtle. If you're interested in extreme contouring, there's plenty of great tutorials out there! My friend Stella has a wicked contouring palette that you can do a ton with. 

I keep it chill, however, using only 3 products: matte bronzer, blush, and highlighter.


Step 1: Using a big fluffy brush, apply a cool matte bronzer along the sides of your face from the bottom of your cheek bones down to the jawline to emphasize your V-line. Blend blend blend, because I've seen this go disastrously wrong! If you think you're applying too much, you probably are. Also, use a bit to shade the area where your eyebrows meet the bridge of your nose. 

TonyMoly Crystal Blusher in 5 Sugar Brown

Step 2: Apply a cute pink powder blush along the tops of your cheekbones.

TonyMoly Crystal Blusher in 2 Pleasure Pink


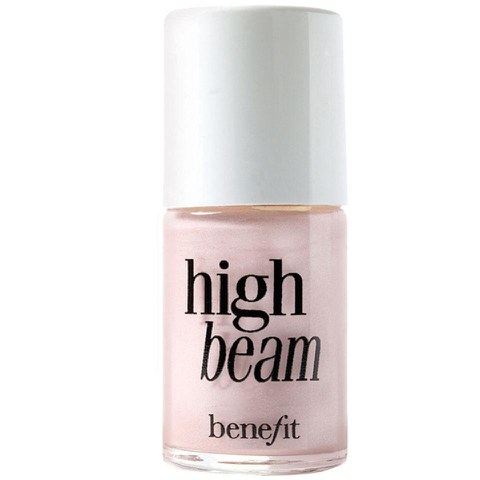
Step 3: Apply a highlighter along the temples, forehead, and down the center of your nose. You can use liquid or powder. My favorites respectively are Benefit High Beam and Dior Diorskin Nude Shimmer Instant Illuminating Powder in 001. Today I'll use High Beam. ^^


Please follow these rough guidelines when contouring. Shade 1 is bronzer, 2 is blush, 3 is highlighter.

Sorryyyyyyy I suck at photoshop


Ok, now for lips! I think the Korean gradient lip look was designed with fuller lipped ladies in mind, but small mouths can still be cute and are on point for this trend specifically.

My K-pop queen of cute <3

To get the signature tiny dolly mouth, you'll need a lip concealer (or a regular concealer if you don't want to buy one specifically for lips). I'll use TonyMoly Face Mix Primer Lip Concealer. 


It should block out most of the pigment in your lips.


Next, take a creamy coral lipstick to add a hint of color and warmth. I'll use MAC Sheen Supreme lipstick in Korean Candy (big thanks to my girl Emma who bought us both matching lipstick as a going away present when I moved to Korea! Love you, girl!).


Subtle and cute.

Here's the finished look for day:

                                        
V-line!!!!

Part 2: Night Look


Now, to make the look a bit more intense and sexy for evening, choose white sparkly liquid liner to bling out your big dolly eyes. I'll use the Etude Tear Drop Liner in 1 White Tear. 


There's also a really pretty gold and pink one, but I like the classic white. Just use it to line the inner corner of your bottom lashes for a sparkly effect. 

You should stop when you reach your pupil.

For a sexy lip look, choose a cherry red lip tint to make a nice gradient look. I'll use the Face Shop Lovely me:ex My Lips Eat Cherry Aqua Tint in 01 Juicy Cherry.

The one on the left.
Just do as you did before and dab it in the center of lips and blend. Use as much as you like for the desired gradient effect. 


That was easy, right? ^^ Here's the finished look:

I call it Betty Boop style kk

Use your cuteness responsibly, lovelies! <3

Thanks for reading! I hope the Korean makeup inspired ulzzang look works well for you! Please comment and tell me what you think or if there are any other Korean styles you'd like to see! ^^

Love,
Angela


Wednesday, July 8, 2015

Romantic Date Night Look

I'd like to thank everyone who has been reading my posts, watching videos, and sharing! Please keep it up! Today, I'm going to show you the evening version of my usual date look. It's very much like the daytime date look, but with more intensity. The color theme is still pink, but the pinks are more vibrant and the eyelashes more luxurious. I like to wear this look when I meet my BF in the evenings when I can get a way with a bolder look kk. I find pink shadows look great on all eye colors, but they make green eyes in particular really pop!


Let's get started!


Step 1: Apply your base makeup of choice for an even, natural finish. I'm going to continue to use my Iope Air Cushion XP in N13 Light Vanilla. If you want to try a shimmery finish, however, now is the time! Readers outside of Korea can find the Iope Air Cushion compacts from around $30-$40 on Amazon. If you're in Korea, just head down to Aritaum! Refills are around $18-20. I usually replace mine every two months. ^^

They're easy to find on Amazon and other places online. This is a top-seller around the world!

Base
Step 2: Concealer! I usually skip concealer in the mornings, but sometimes by evening I look a bit more tired. A good concealer will cover dark under-eye circles and keep you looking like a panda! Try a high quality one with a creamy formula that doesn't sink into fine lines but is opaque enough to cover blemishes if required, like Clarins Instant Concealer (I use 01). It retails for around $30 on Sephora or Amazon, but you can get it at department stores here in Korea if you want to try it first.

Concealer

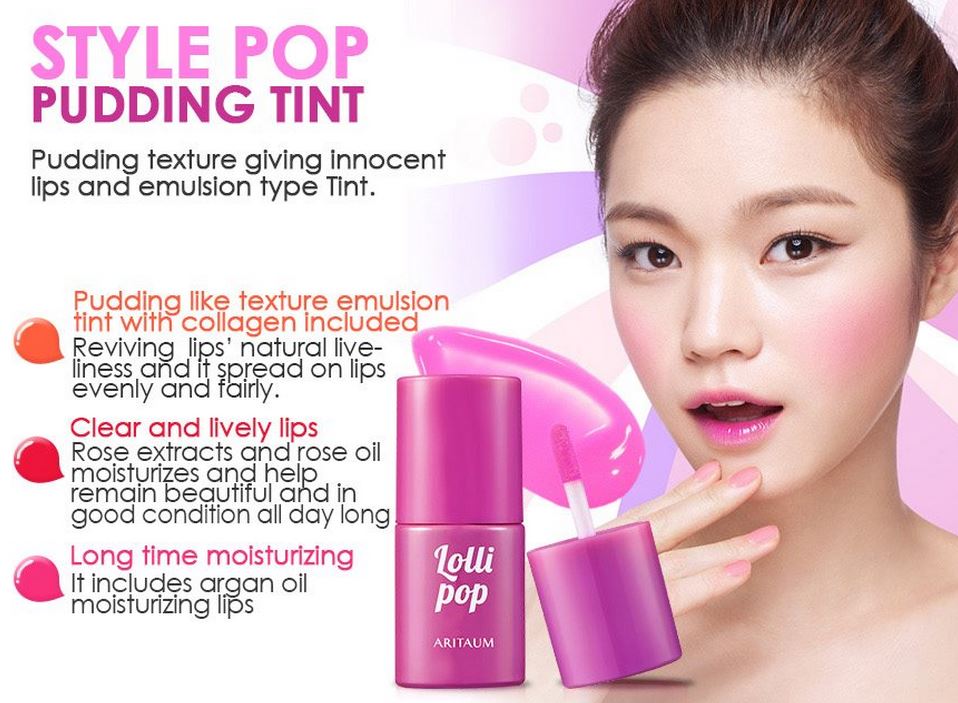
Step 3: Use the same candied orchid shade Aritaum Style Pop Pudding Tint in No.4 Lollipop on your lips and cheeks, focusing on your cheekbones rather than the apples of your cheeks this time. As y'all know, this ish will give you the perfect sweet oink shade! I couldn't find it many places online, but ebay definitely has it! Check it out! 


Lip and cheek tint


Step 4: Get your eyebrows straight! Keep them as soft as possible. I'm still using the Clio Kill Brow Tattoo Lasting Gel Pencil in 02 Light Brown. You can get it at Club Clio stores or Olive&Young in Korea. It's pretty cheap--around $10!


Eyebrows


Step 5: Apply a primer to your eyelids from lash line to just above the crease. This is so important! I'm using the Etude House Proof 10 primer, which is just a godsend. It's way cheaper that Urban Decay at around $5.50! You can get it at Etude here or Amazon.


Step 6: Take two of the Etude House Play 101 pencils in 16 and 20. These are great for eyes, cheeks, and lips but we'll do it for eyes today. 


First take the light pink shade (16) and apply it all over the lid to the crease. Before it sets, use your fingertip to smudge it around and smooth it out to a uniform light pink.


Base light pink

Next, take the darker shade (20) and line your upper lashes with it. It's going to look really bright, but don't worry, we'll fix it! 

Dark pink point

The last step is simple, smudge the two shades together with your fingertip to create a gentler gradation. 


Blended. Pretty, right? ^^
Step 7: Liner! If you like the idea of bright pink shadow for day, I recommend a brown pencil just along the lash line. However, this look if for night, so let's use our favorite black liquid or gel liner. Just line the natural shape of your eye, making a slightly bolder line than for the daytime look, Give it a little wing at the end. I'm using the Clio Kill Black pen liner, which you can get online at ebay or amazon or in Club Clio/Olive&Young in Korea! It's around $10-$12 online, but worth every penny! 


Eyeliner

Step 8: Mascara. I would use a primer, but I'm out of lash primer at the moment and haven't repurchased yet. I'll improvise instead and use a tubing mascara with a non-clumping formula to just lift and separate the lashes before applying a high impact formula. I'm going to use NYX Doll Eye for the first coat, which is my go to drug store mascara. ^^

Mascara coat 1

Now break out the high impact formula for the second coat! I'll use Lancome Grandiose Wide Angle Fan Effect Mascara. It has that cool swan neck wand and retails around $32. This stuff is amazing! It's kind of pricey, but worth it. 


Mascara coat 2

Step 9: Cream blusher. To make your evening look lovelier, add some pink cream blush to your cheekbones! Just make sure you keep it on the outside of your face. If you're not sure, hold two fingers up to your face next to our nose. The blush should not come within two finger widths of your nose--that part should stay white. I'm going to use the Etude House Sweet Recipe Cupcake all over color in PK002 Strawberry Chiffon Cake. It's a cute baby pink cream blush that can also be used on lips and eyes (though I don't like the finish on lips at all). 


Cream blush

Step 10: The last step is to make a nice gradient lip! If you like the lips with just the Lollipop tint, then curl your hair and head out! If you want a more intense look, grab a deep pink lipstick with a creamy blendable formula. I like the Etude House Dear My Wish Lips Talk in PK003, the same shade Krystal wore in the promotions. I love this line of lipsticks! They're pretty cheap too at around $9.50. Just dab the lipstick in the center of your lips and blend out to make a nice gradation. 


Lipstick

Ok, you're all finished! Throw on your LBD and sexy hairstyle, and head out to meet your date! 


What do you think of the look? ^^ Do you like to wear bright eyeshadow colors for day or night? 

Enjoy your date~~~

Kisses,
Angela